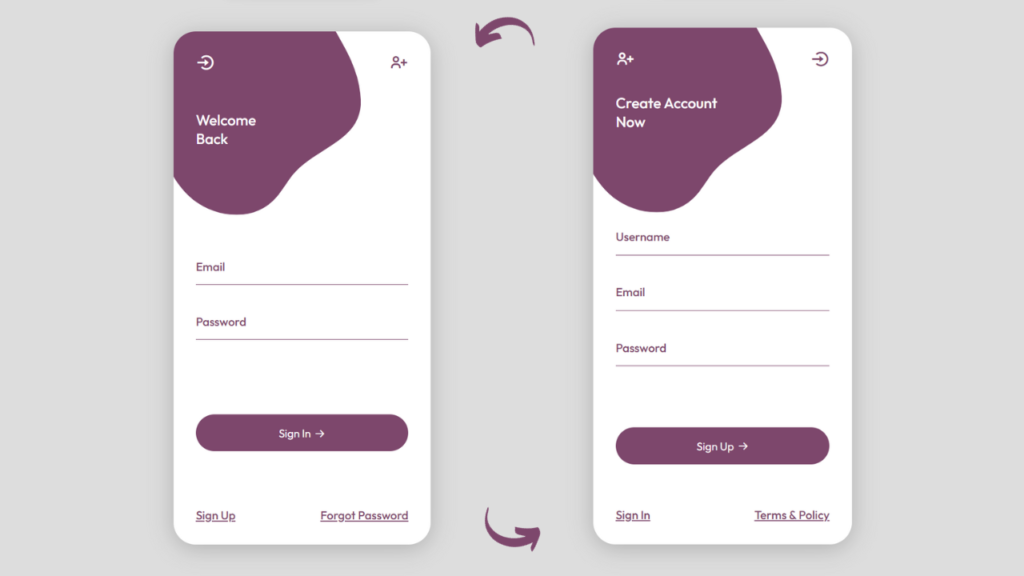
In this tutorial, you will learn how to create a beautiful and interactive login and registration form using HTML, CSS and JavaScript. You will use HTML to create the structure of the form, CSS to style the elements and add animations, and JavaScript to switch between Sign In And Sign Up of the form.
You will also learn how to use some advanced CSS features such as transitions, transforms, pseudo-elements, and keyframes to create stunning effects and animations. By the end of this tutorial, you will have a fully functional and responsive login and registration form that you can use for your own projects or websites.
The tutorial could be divided into the following steps:
1. Creating HTML Structure
You will need to create a container element that will hold the form elements, such as inputs, buttons, labels, and links. You will also need to create two separate forms, one for login and one for registration, and wrap them in a wrapper element that will allow you to switch between them. You will use some HTML attributes and classes to identify the elements and make them easier to style and manipulate later.
2. Styling With CSS
Style the form elements using CSS. You will use CSS to add colors, fonts, borders, shadows, and other styles to the form elements. You will also use CSS to position and align the elements using flexbox, grid, or other layout techniques. You will also use CSS to create some basic animations, such as changing the background color or opacity of the buttons on hover or focus.
3. Adding JavaScript
Add interactivity to the form using JavaScript. You will use JavaScript to add some logic and functionality to the form, such as validating the input values, showing or hiding error messages, toggling the visibility of the password, and switching between the login and registration forms. You will also use JavaScript to add some event listeners to the form elements, such as click, input, change, or submit, and execute some functions or actions based on the events.
4. Adding Advanced Animations
Create more advanced animations using CSS. You will use CSS to create some more complex and impressive animations, such as sliding, flipping, rotating, or scaling the form elements. You will use some advanced CSS features, such as transitions, transforms, pseudo-elements, and keyframes, to create these animations. You will also use CSS to create some custom shapes and icons, such as a checkbox, a eye, or a user avatar, using only CSS properties and values.
HTML Codes Starting Point
<!DOCTYPE html>
<html lang="en">
<head>
    <meta charset="UTF-8">
    <meta name="viewport" content="width=device-width, initial-scale=1.0">
    <title>Awesome Login Form | Ludiflex</title>
    <!-- BOXICONS -->
    <link href='https://unpkg.com/boxicons@2.1.4/css/boxicons.min.css' rel='stylesheet'>
    <link rel="stylesheet" href="assets/css/style.css">
</head>
<body>


        <!-- Login Form - Container -->


        <!-- Register Form - Container -->


    <script src="assets/js/main.js"></script>
</body>
</html>
CSS Codes Starting Point
/* OUTFIT FONT */
@import url('https://fonts.googleapis.com/css2?family=Outfit:wght@300;400;500;600&display=swap');

/* ==== COLOR VARIABLES ===== */
:root{
    --first-color: #7D476C;
    --bg-color: #DDDDDD;
    --white-color: #FFFFFF;
}
/* ==== BASE ===== */
*{
    margin: 0;
    padding: 0;
    box-sizing: border-box;
    font-family: 'Outfit', sans-serif;
}


/* ===== Login Form Container ===== */


/* ===== Register Form Container ===== */


/* ==== Fluid Animation ===== */
JavaScript Starting Point
const loginBtn = document.querySelector("#login-btn");
const registerBtn = document.querySelector("#register-btn");
const loginIconBtn = document.querySelector("#login-icon-btn");
const registerIconBtn = document.querySelector("#register-icon-btn");

const loginForm = document.querySelector(".login-container");
const registerForm = document.querySelector(".register-container");

const fluid = document.querySelector("#fluid");
Download Assets from the link below.
Or Download all Codes :
- Buy Me A Coffee: https://www.buymeacoffee.com/ludiflex/e/186764
- Ko-Fi: https://ko-fi.com/s/a808210d02

